As we design multimedia learning experiences for our students, we need to incorporate what the research tells us about how our students learn best. The fields of education and cognitive psychology have many lessons for us. This video from LinkedIn Learning (UIS subscribes to this resources for all staff and students) does a good job explaining two major lessons we can incorporate into our multimedia design. This includes lecture slides, web pages, or videos -- any format that includes more than one type of media (text, images, or audio).
Brain hacks for slide design from Create and Deliver Standout Technical Presentations by Melissa Marshall
The research of Richard Mayer and several co-authors inform the 12 principles of multimedia learning. Mayer and Ruth Clark's 2016 text, E-learning and the science of instruction (4th ed), is an excellent resource.
Tools to Record Videos at UIS
Kaltura
Kaltura is the screen recording tool and video streaming platform for UIS. Learn more about Kaltura (My Media in Canvas).
Green Screen
COLRS has a green screen or chroma key backdrop available in the studio. Our multimedia specialist will plan your video with you, and then replace the green backdrop with video, PowerPoint slides, and/or images.
Lightboard
A lightboard is a specialized teaching and presentation tool used primarily in educational and instructional settings. It is designed to help educators and presenters create engaging and visually appealing content while facing their audience and writing on a board. Learn about lightboard usage at Northwestern for ideas for your courses. You can also read lightboard research articles and white papers compiled by a vendor.
Why lightboard videos can increase learning
Lightboard videos can be leveraged to employ Richard Mayer’s research on the 12 Principles of Multimedia Learning in multimedia learning.
- The Temporal Contiguity Principle tells us that visuals and audio should occur at the same time. Be sure to narrate and explain while you draw!
- The Signaling Principle tells us that people learn the most when they are told what to pay attention to on a screen. In a lightboard video, this means that you should consider underlining your words, changing marker colors, or gesturing with your hands.
- The Spatial Contiguity Principle tells us that related words and images should be near one another. Put this to use in your drawing and text on the light board.
- The Redundancy Principle tells us that people learn best from graphics and narration. Having the text that you are speaking written verbatim on the screen decreases learning. Lightboard videos help us to avoid the PowerPoint trap of writing all that you say on the slide.
- The Modality Principle tells us that people learn best from visuals and spoken language. Use the lightboard to illustrate processes or draw diagrams. Limit the text you write on the lightboard.
- The Pre-Training Principle tells us that people learn more efficiently when they get the basics first. Provide definitions for key terms before you dive into illustrating a complex diagram.
- The Segmenting Principle tells us that people learn best in small chunks. Create narrow focused videos that do not exceed 5-7 minutes.
- The Coherence Principle tells us that people learn well when we cut out extraneous material. Before you record, plan your video. Create an outline of what you will say and draw on the screen.
Ideas for using the lightboard
- Lectures and Course Content Creation: Professors can use lightboards to create engaging lectures and course content. They can write and draw diagrams in real-time while facing the camera, making complex concepts more understandable to students.
- Demonstrations: Lightboards are great for demonstrating experiments, problem-solving processes, or step-by-step procedures. Professors can draw diagrams or write equations while explaining each step, enhancing comprehension.
- Collaborative Projects: Students can use lightboards to create their own presentations or tutorials as part of group projects. This encourages collaboration, research, and creative content creation.
- Review Sessions: Professors can use lightboards for review sessions before exams, summarizing key points, and clarifying difficult topics.
- Research and Visual Data Presentation: Researchers can use lightboards to explain their findings visually and engage with their peers and students during presentations.
Effective Practices
- Write strategically. The lightboard’s writing surface is a smaller working area compared to a classroom’s chalkboard space. If a complete topic can be covered with one board’s worth of text, minimal editing is required after the recording is done.
- Think about your attire. The video frames are reversed, so text on your clothes will appear backwards — a distraction for your students. Also, wearing bright, solid colors (no small patterns!) will help you to appear clearly in the black backdrop of the video.
- Prepare visual aids ahead of time. Visual aids (PowerPoint slides, photographs, or other videos) can be superimposed at varying opacities over the camera video in post-production (after you’ve recorded). If your have your visuals prepared ahead of time, we can determine what will and won’t work for the lightboard video.
Accessibility -- Considerations for Before, During, and After you Record
Before and During Recording
As you plan and record your videos:
- Be sure to speak at a moderate and enunciate. Taking care as you record audio will make it easier for students to hear and improve the accuracy of machine captions.
- Plan for audio descriptions. Audio descriptions describe any on-screen activity or visuals through audio tracks or transcripts and are required for full accessibility of videos. The simplest way to include audio descriptions is to build the audio descriptions into your video lectures from the beginning. As you record your lectures, be sure to describe any data or images on the screen. For instance, if you are creating a Light Board video where you are drawing a graph on the board, simply explain what you are drawing as you are doing it. If you are narrating a PowerPoint lecture, describe what is on the screen. If there is a graph, describe the X and Y access and what the data shows. If text is all that is on your slide, make sure you speak all the text.
After the video is created
All videos must have accurate captions. Though machine captions are added to your videos automatically, those captions should be reviewed for accuracy. Learn about video accessibility. COLRS employs students on our Digital Accessibility Remediation Team to assist with faculty with captioning. Please contact us to have your videos and other documents remediated.
Tips to Record High Quality Videos
Digital classrooms and videoconferencing have become an integral part of our lives in the post-COVID world. To make a strong virtual impression, it's important to ensure that you appear in the best possible light. COLRS Multimedia Specialist Scott Moomaw is here to provide you with valuable insights on camera placement and lighting that can significantly enhance your virtual presence.
Camera Lighting
- Camera placement and angle
- Proper lighting, including whether a dedicated light is worth the effort
- Avoiding harsh glares and backlighting
Audio
- Audio quality is a must-have.
- When is your built-in microphone sufficient?
- When do you need to upgrade to a dedicated microphone?
- Lavalier or Tabletop microphone?
Engagement
- Keep videos brief
Topics and Tips for Creating Multimedia for Courses
How to create narrated video lectures in PowerPoint
+
You can record audio narration using any version of PowerPoint that is installed on your computer. You cannot record audio using PowerPoint 365 via a web browser.
Make sure the presentation is saved as a PowerPoint Presentation with a .pptx extension (not the compatible mode).
- Record your narration and timingsLinks to an external site..
- Export your narrated PowerPoint to a video format.
- Now that you’ve created your video, upload the video to Kaltura through Canvas.
- Embed the Kaltura video in your Canvas course.
Bumper Videos
+
Michelle Pacansky-Brock’s research asserts that “humanizing” online classes “leverages learning science and culturally responsive teaching to create an inclusive, equitable online class climate for today’s diverse students” (2020). You can learn more about strategies for humanizing your courses by reviewing her infographic, but one way to do so is to utilize short introductory and/or wrap up videos. At the course level, this could be starting with a video introducing yourself as both an instructor and a person; at the module level, you can use “bumper videos” to kick off units/modules, introduce difficult concepts, and more!
What is a “Bumper Video?”
Bumper videos are short, visually-oriented videos intended to introduce or wrap up a concept. In other words, these videos aren’t intended to be the sole means of delivering content. Instead, these 2-3 minute videos can help get students thinking about a concept, can clarify a difficult part of the course’s content, or can help students reflect on their learning.
The goal of a bumper video is to increase student engagement, so it’s important that you aren’t solely focused on a talking head or a slideshow, but some mixture of both. Utilizing multiple camera angles and/or animated text and graphics can help hold the viewer's attention, as well. Scott Moomaw, the Multimedia Specialist with the COLRS office, can help you bring these videos to life.
Considerations When Creating a Bumper Video
Kaltura Capture
The COLRS office recommends that all faculty members use Kaltura as the means of recording and/or uploading video as much as possible. Uploading videos directly into Canvas can cause you to run out of storage quickly.
Pre-recording and Editing
These bumper videos are meant to be highly engaging introductions or conclusions to your course and/or modules. As such, it’s important to put your best foot forward by taking the time to record the video in advance and edit the video in an engaging way. Setting aside time to do multiple takes of a video, try out different delivery styles, and even script some of your content if you’d like can completely change the outcome of the video and will give you more options to choose from in the editing process. You might also consider where you’d like to record the video; a classroom or lecture hall might come to mind first, but the COLRS Studio is also a great resource to use for these kinds of recordings.
Mayer’s 12 Principles of Multimedia
Richard Mayer–a Distinguished Professor of Psychology at the University of California, Santa Barbara–wrote Multimedia Learning to describe his 12 principles of multimedia learning. Water Bear Learning goes into more detail on each of the principles, but broadly, when creating a video, consider the following:
- The Coherence Principle: only use information that the learner needs in the moment.
- The Signaling Principle: draw attention to the most important thing on the screen.
- The Redundancy Principle: use narration and provide graphics on screen, but leave most of the on-screen text to the captions.
- The Spatial Contiguity Principle: group relevant text and images together.
- The Temporal Contiguity Principle: group relevant audio and visual together.
- The Segmenting Principle: keep your videos short and stay on topic.
- The Pre-Training Principle: use short videos to let students know what to focus their attention on.
- The Modality Principle: use visuals and spoken words together, since that’s how we learn best (we don’t learn as well from text).
- The Multimedia Principle: use visuals alongside words, since words and pictures are more effective than words alone.
- The Personalization Principle: use conversational language that is true to who you are.
- The Voice Principle: use your voice, not the voice of a computer or machine.
- The Image Principle: use a combination of talking heads and other visuals to hold students’ attention.
Video Accessibility
We want to offer all people the best user experience possible. Making your content accessible is the way to do so and ends up benefiting everyone in some way. This can be easier said than done, but keeping a few things in mind can greatly impact the accessibility of the video:
- Planning it out: Taking the time to plan out your video (the script, how it will be recorded, etc.) gives you opportunities to plan out how you’ll make it accessible, too. The Web Accessibility Initiative has a great checklist you can use to plan out your video content.
- Be descriptive: Explain what we’re seeing on screen or what you want people to know. For example, if you’re showing a table with data on screen, don’t just say “as you can see from this table.” What’s on the table that’s important for others to know?
- Consider descriptions of visual information: If you have important visuals on screen, consider ways of providing descriptions, like a recorded description or a descriptive transcript.
- Captions and transcripts: Kaltura will do most of the work for you if you follow these instructions to caption the videos. After the initial captioning process, you can edit the captions yourself, or you can reach out to COLRS Digital Accessibility Remediation Teamfor assistance. From there, Kaltura will create a transcript with time stamps that students can view. Of course, if you’ve planned out a script in advance, you can build on that for your captions and transcript, too.
Impact on the Online Classroom
Utilizing these techniques and making these considerations when creating short introduction/wrap up videos can lead to an increased retention of the content, as described in Andrew DeBell’s summary of Mayer’s 12 Principles of Multimedia. Students also recognize the effort you’ve put into anticipating their needs, concerns, or frustrations when you use these videos to “showcase a tricky concept that you know has a tendency to stump students” (Pacansky-Brock, n.d., emphasis in original).
These kinds of videos also contribute to stronger community-building, especially between you and students, due to an increase in social presence. Wei, Chen, and Kinshuk (2012) write that a “lack of social presence may lead to a high degree of frustration, an unreasonably critical attitude toward the instructor’s effectiveness, and a lower level of affective learning.” To combat these negative attitudes and lower outcomes, increasing your social presence in an online classroom can help. Karen Costa, author of 99 Tips for Creating Simple and Sustainable Educational Videos, shares advice for positively increasing your social presence through videos; some of her tips on her YouTube page include “Show[ing] Your Humanity” and “Speak[ing] from Your Heart.”
Making Your Presentations Their Best: Even at Home
+
How can we look and sound our best in Zoom or video presentations? Scott Moomaw, the multimedia specialist for COLRS, shares a few easy hints for making sure your home video productions and Zoom meetings look as good as they possibly can.
In the studio, it is easier to look and sound good. We have the equipment we need: cameras, microphones, lighting, everything to make your presentation its best. But we’re not in the studio right now. We’re all working remotely, trying to do our best with our laptops and virtual conference rooms, but we can still do many things to look our best.
Background
First, be aware of your surroundings. Your background, in particular is important. If you’re unsure about your background, go with something plain — a wall or tidy bookcase. My basement office doubles as the kids’ playroom when I’m not here. I hung a simple curtain rod as a backdrop to provide a bit more of a professional appearance.
Lighting
Be aware of any harsh light sources. Never set yourself up with a window or other bright light source right behind you. Use a desk lamp or another light source to highlight yourself. You don’t want to be a silhouette to your viewers.
Camera Angle
Adjust your camera position so that it’s looking at you straight on. You may need to elevate your laptop for this to work, but an upward facing camera is an awkward angle and can be distracting, even uncomfortable for the viewer.
And there you go. It doesn’t take much to create a pretty drastic improvement in how you come across to your audience.
Clothing Choices
One thing that often gets overlooked is the clothes you wear. Of course, we all know what it means to wear professional attire. But even then, certain colors or patterns are better avoided. Bright white shirts or blouses, because of how they reflect light, can overwhelm the rest of the screen, sometimes even giving you a ghostly outer glow that could distract or disengage the viewer.
Depending on where the video will be hosted or how broad its reach is expected to be, certain shades of green should also be left in the closet. Most chroma effects rely on green screen technology to create their backgrounds. In a studio setting, a green shirt, or even a necktie, can cause you to literally disappear in the background. In other settings, wearing green can merely invite online mischief.
You should also try to avoid prints and patterns. Ornate patterns and plaids, because of the way they move with you and reflect light, can sometimes “trick” the photo receptors in a video camera (particularly the webcam on your computer, which is not a higher-grade receptor), resulting in a flicker effect that will again be distracting to the viewer.
Video Length: The Most Important Step to Maintaining Viewer Engagement
+
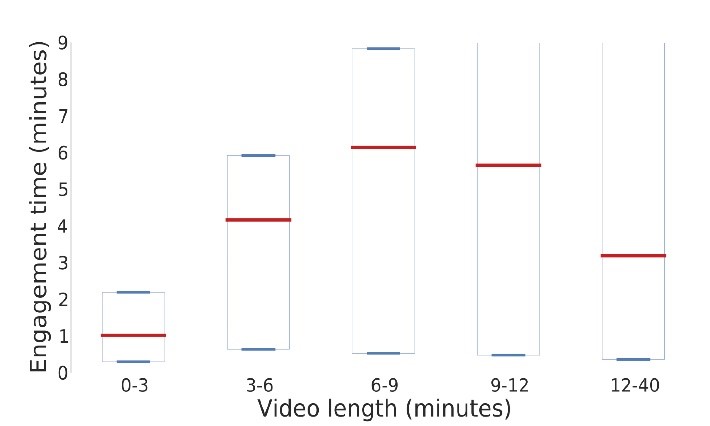
More than any other factor, studies have shown that the length of your presentations is the most important consideration in making sure your viewers remain engaged.
According to a study by professors Philip J. Guo, University of Rochester/MIT (now UC San Diego); Juho Kim, MIT (now KAIST); and Rob Rubin of edX, viewer engagement declines after six to nine, minutes, regardless of the video’s overall length.
So how do we make our videos a reasonable length while still getting across all the information a particular lesson may require? The short answer: pre-production. A carefully crafted script and production plan will help make the most effective use of your time. For particularly long or detailed lessons, it may be best to break the lesson down into shorter component parts.
COLRS at UIS stands ready to help you craft and produce video lessons that will maximize your students’ engagement, for the most effective use of both their time and yours. Our in-house studio, light board, and overhead camera are all ready for your use.
Advantages to Writing Video Outlines and Scripts
+
You can record audio narration using any version of PowerPoint that is installed on your computer. You cannot record audio using PowerPoint 365 via a web browser.
Make sure the presentation is saved as a PowerPoint Presentation with a .pptx extension (not the compatible mode).
- Record your narration and timingsLinks to an external site..
- Export your narrated PowerPoint to a video format.
- Now that you’ve created your video, upload the video to Kaltura through Canvas.
- Embed the Kaltura video in your Canvas course.
Resources
+
The following resources might be helpful when creating lessons, activities, or assignments that make use of multimedia:
- The New York Public Library has a digital collection of over 850,000 items, including prints, photos, videos, and more. Nearly 300,000 of these items--as well as other activities--are in the public domain.
Recording Video on a Phone
+
Many UIS faculty use their phones to record on location or in a laboratory to demonstrate processes for students. Current models of cellphones often record high quality video. Oftentimes, though, the sound quality on phone video is problematic (e.g., low volume, wind noise, etc.). COLRS can help you record and replace poor quality audio.
Follow these steps for recording video lectures with your phone or tablet:
- Hold phone horizontally, in order for the video to better fit the embedded video interface in Kaltura (My Media).
- Do not attempt to finalize the narration of the video as you’re shooting. You can read your script to help with the timings; just plan to replace it with higher quality recordings.
- Write a script for the finished video to ensure you leave enough time for the recorded narration.
- Record the shots you need to fit in with the narration. Shoot more video than you think you’ll need. It is easy to cut footage out of a video, but difficult to extend it if your narration runs longer than planned.
- Narration can be recorded and replaced later with the audio equipment in COLRS.
If recording audio with COLRS is not practicable, or if you are shooting any type of interview or lecture, or anything with a person on camera talking, you will want to schedule a video shoot with COLRS or invest in a phone adaptable microphone for improved sound quality.
Multimedia and Interactivity in Online Courses
+
Regardless of subject, all online courses have one objective in common: student engagement. Engagement drives learning, but what drives engagement? Inspiring curiosity, communicating effectively, fostering connection, and developing compassion between professor and student are the pillars of an engaging online course. Incorporating multimedia elements into your online courses is an excellent way to accomplish these goals.
Usually, when we think of multimedia, our imaginations immediately go to video content, but there’s more to it than that. Multimedia, in the most basic sense, is the combination of two or more forms of media: text, images, video and audio. Multimedia also includes animation–either in the classic sense of what we consider animation, or in the use of animation to bring charts and graphs to life, allowing viewers to watch trends develop or data accumulate over time.
Interactive quizzes and gamification of certain course elements are another way of stimulating more active participation from your students. This can mean something as basic as “click-and-reveal” content, like hidden flashcards or expandable content; clickable quizzes that must be completed before continuing the video or slideshow; clickable checklists to ensure students complete the required work in the correct order; or active gaming, like timed multiple choice questions with rewards for faster completion. These elements bring about a deeper level of engagement from students, making them extremely useful for teaching more complicated or abstract concepts.
This type of interactive content can be incorporated using tools like DesignPLUS and H5P. COLRS is available to guide you through how these tools work and to help you use them in your course.
So which multimedia elements do you want to include in your course? As with most things, variety is important. A static video of you presenting a PowerPoint slideshow or Light Board demonstration is a valuable tool for delivering lesson content, but over-reliance on one method of delivery can be detrimental to the student engagement mentioned above.
When adding multimedia to your online course, consider the following questions:
- Does it tie in with the course objectives?
The media you use in your course must have a clear reason behind it. Whatever the objective of a particular lesson plan, your choice of multimedia elements should serve that objective in a clear way. Multimedia for the sake of multimedia is more likely to be seen as extraneous to the point of the lesson, distracting students from the actual objective of the course. - Is the media of good quality? Are pictures sharp, graphics clear, and audio clean and understandable?
Low-resolution images and video are not only worse than high-resolution, they are in many ways worse than no images or video at all. Take the time to gather quality media to support your lesson. Most smart phones are capable of shooting video in HD resolution or better, but if shooting video on your own, make sure your subject is well-lit and that the accompanying audio is free of distortion and background noise.
Quality of images also means being sure the media you use is both fully necessary to the course objective, and also clear enough in what it’s showing that it will be fully understood. Always be willing to ask yourself if there is a better image, graphic, or video to convey the point you’re making.
The COLRS studio has professional-grade audio, video, and lighting equipment available for your use, allowing you to concentrate on the message you’re delivering and not have to worry about also managing your recording operations. - Is the media accessible for all students?
Closed captioning, alt text, and descriptive audio are necessary parts of any multimedia element you include in your online classes. If your video includes charts or graphs, it isn’t enough to tell the viewer what the chart is measuring; you must also describe the trends or patterns the chart is revealing, the scale used for measuring, the time period being shown, or any other relevant information. - Are you including a variety of media elements?
Not everyone learns in the same way. Good video material is helpful for both visual and auditory learners. Slideshows and graphs can be better for reading/writing learners. And gamification elements might be best for kinesthetic learners. Presenting your course material in different formats empowers all types of learners to consume the material in the way they learn best.