The Center for Online Learning, Research, and Service (COLRS) Digital Media Studio is located in Brookens 435. COLRS provides support for UIS faculty and staff to develop a wide range of instructional videos, including lightboard videos and green screen work, narrated PowerPoint lectures, audio lectures, and on-campus location filming.
The Digital Media Studio is coordinated by Multimedia Communications Specialist Scott Moomaw. Please schedule an appointment with Scott to plan your video or media production and be added to his schedule.
Digital Media Projects
Lightboard Videos
+
A lightboard is a specialized teaching and presentation tool used primarily in educational and instructional settings. It is designed to help educators and presenters create engaging and visually appealing content while facing their audience and writing on a board.
How a lightboard works and what it does:
- Transparent Surface: A lightboard consists of a large sheet of transparent glass or acrylic that is typically illuminated from the edge. The presenter stands behind the glass while writing or drawing on its surface.
- Fluorescent Markers: To create content on the lightboard, the presenter uses fluorescent markers. These markers emit bright, visible colors that stand out against the illuminated background.
- Writing and Drawing: The presenter writes or draws directly onto the glass surface. As they do this, the text or drawings appear as if they are floating in mid-air due to the transparency of the glass.
- Reversed Image: The camera capturing the presenter's actions flips the image horizontally so that it appears correctly oriented to the audience. This reversal compensates for the natural left-right inversion that occurs when writing on a transparent surface.
- Video Recording: The entire presentation on the lightboard can be recorded by cameras positioned in front of the presenter. This recording can be live-streamed or saved for later use, making it useful for creating educational videos, lectures, tutorials, and presentations.
From the instructor’s point of view, they’re writing on a surface analogous to a chalkboard while facing a camera. From the student’s point of view, the instructor is making eye contact while speaking with them while writing in midair.
Why lightboard videos can increase learning
Lightboard videos can be leveraged to employ Richard Mayer’s research on the 12 Principles of Multimedia Learning in multimedia learning.
- The Temporal Contiguity Principle tells us that visuals and audio should occur at the same time. Be sure to narrate and explain while you draw!
- The Signaling Principle tells us that people learn the most when they are told what to pay attention to on a screen. In a lightboard video, this means that you should consider underlining your words, changing marker colors, or gesturing with your hands.
- The Spatial Contiguity Principle tells us that related words and images should be near one another. Put this to use in your drawing and text on the light board.
- The Redundancy Principle tells us that people learn best from graphics and narration. Having the text that you are speaking written verbatim on the screen decreases learning. Lightboard videos help us to avoid the PowerPoint trap of writing all that you say on the slide.
- The Modality Principle tells us that people learn best from visuals and spoken language. Use the lightboard to illustrate processes or draw diagrams. Limit the text you write on the lightboard.
- The Pre-Training Principle tells us that people learn more efficiently when they get the basics first. Provide definitions for key terms before you dive into illustrating a complex diagram.
- The Segmenting Principle tells us that people learn best in small chunks. Create narrow focused videos that do not exceed 5-7 minutes.
- The Coherence Principle tells us that people learn well when we cut out extraneous material. Before you record, plan your video. Create an outline of what you will say and draw on the screen.
Ideas for using the lightboard
- Lectures and Course Content Creation: Professors can use lightboards to create engaging lectures and course content. They can write and draw diagrams in real-time while facing the camera, making complex concepts more understandable to students.
- Demonstrations: Lightboards are great for demonstrating experiments, problem-solving processes, or step-by-step procedures. Professors can draw diagrams or write equations while explaining each step, enhancing comprehension.
- Collaborative Projects: Students can use lightboards to create their own presentations or tutorials as part of group projects. This encourages collaboration, research, and creative content creation.
- Review Sessions: Professors can use lightboards for review sessions before exams, summarizing key points, and clarifying difficult topics.
- Research and Visual Data Presentation: Researchers can use lightboards to explain their findings visually and engage with their peers and students during presentations.
Effective Practices
- Write strategically. The lightboard’s writing surface is a smaller working area compared to a classroom’s chalkboard space. If a complete topic can be covered with one board’s worth of text, minimal editing is required after the recording is done.
- Think about your attire. The video frames are reversed, so text on your clothes will appear backwards — a distraction for your students. Also, wearing bright, solid colors (no small patterns!) will help you to appear clearly in the black backdrop of the video.
- Prepare visual aids ahead of time. Visual aids (PowerPoint slides, photographs, or other videos) can be superimposed at varying opacities over the camera video in post-production (after you’ve recorded). If your have your visuals prepared ahead of time, we can determine what will and won’t work for the lightboard video.
Resources
- Lightboard.info: The lightboard was invented by Prof. Michael Peshkin at Northwestern University. Learn about the concept on his original site.
- Lightboard usage at Northwestern: Check this article out for ideas for your courses.
- Lightboard Research Articles & White Papers: This lightboard vendor has a great list of academic research on multimedia learning that lightboard videos can support.
Green Screen
+
COLRS has a green screen or chroma key backdrop available in the studio. Our multimedia specialist will plan your video with you, and then replace the green backdrop with video, PowerPoint slides, and/or images.
Examples for Green Screen Videos in Your Class
Your videos can (and should!) be unique to you and your discipline. Some ideas to help you get started include the following:
- Use a photo of a CPU or an atomic model or graph--you can stand in front of it and explain its parts like a weatherman
- Use "B roll" video footage as your backdrop for whatever topic you are speaking on
- Replace the green with a solid color and add text to the video in post production
- Lecture in front of your presentation slides (see this example from a Duke University professor)
Royalty-free Image and Video Sources
- Digital.gov's Video Stock Footage
- Archive.org Free Video
- Wiki Media Commons
- The Beat's List of "The Best Stock Video Sites for Editors"
Preparing for a Green Screen Recording Session
- Don't wear green!
- Practice your lecture ahead of time
- Create any slides or locate any images or videos to be added in post production before recording
Producing Your Green Screen Video
Green screen videos require more planning and editing, so it might take some time to prepare your finished product. As the instructor, you may also need to be present to make some production choices. Contact COLRS at colrs@uis.edu to book studio time.
Shaky Hand Videos
+
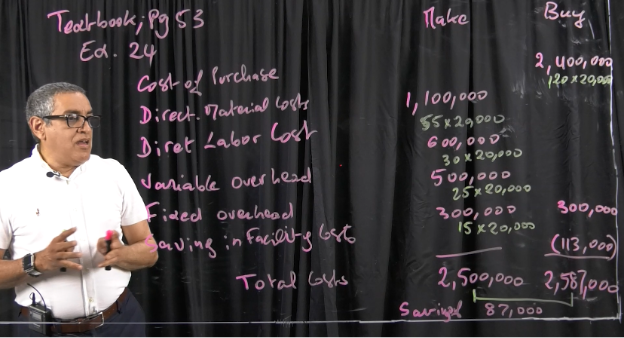
Shaky hand videos are recorded using a video camera mounted parallel to a table. Instructor can manipulate models, draw graphs and other visuals, solve math equations, and record their voice over explanations. See this example of drawing line graphs below.
Uses for Shaky Hand Videos
Shaky hand videos allow for opportunities to showcase your personality in your delivery. For ideas to get your started, consider the following:
- Bring in a printed poem and annotate or show form
- Use atomic models to show chirality or bonds
- Draw and analyze a graph
- Solve mathematical equations
- Draw a process
- Use printed PowerPoint Slides and annotate with markers
Planning a Shaky Hand Video
Before stepping into the studio, consider:
- Video length: what can you pre-draw?
- Transitions: will they be needed? Where/when?
- Time-lapse: Is there a section of your video we can do a time-lapse of? This would require recording narration separately.
Book Your Recording Time
Contact COLRS at colrs@uis.edu to book your recording time.
Interactive Videos
+
Interactive videos are created using H5P. The tool allows instructors to add questions along the video timeline. Total scores on interactive videos can be connected to the Canvas gradebook, though detailed information on student responses (correct/incorrect answers) is not available. View a sample below.
Instructors may also create H5P interactions using the free Lumi H5P desktop editor and contact COLRS to add the interactions to a Canvas course as a graded assignment or ungraded learning object.
Custom Video Editing and Production
+
Our Multimedia Specialist can work with you to develop your video exactly the way you want it to be. Whether you want to include animated charts and graphics, dynamic texts and slides, or other visual effects is up to you. You can record just your voice to narrate video animations, or you can speak directly to the camera. Or you can choose any combination thereof. However you want to share your lesson
On-campus Location Shoots
+
Our studio is best for lightboard or green screen shoots. If you would prefer your video to be in a more natural setting, our Multimedia Specialist can come to you, anywhere on campus. Whether it’s your office, a classroom, a conference room, or even an outdoor shoot (weather permitting!), it’s all part of producing a finished video that looks exactly how you want it to l