

Table of Contents
How to Log In
+
To login to the website go to the Login page and use your normal NetID credentials. Once you log in you will be redirected to the website and should see a black bar across the top of your screen.
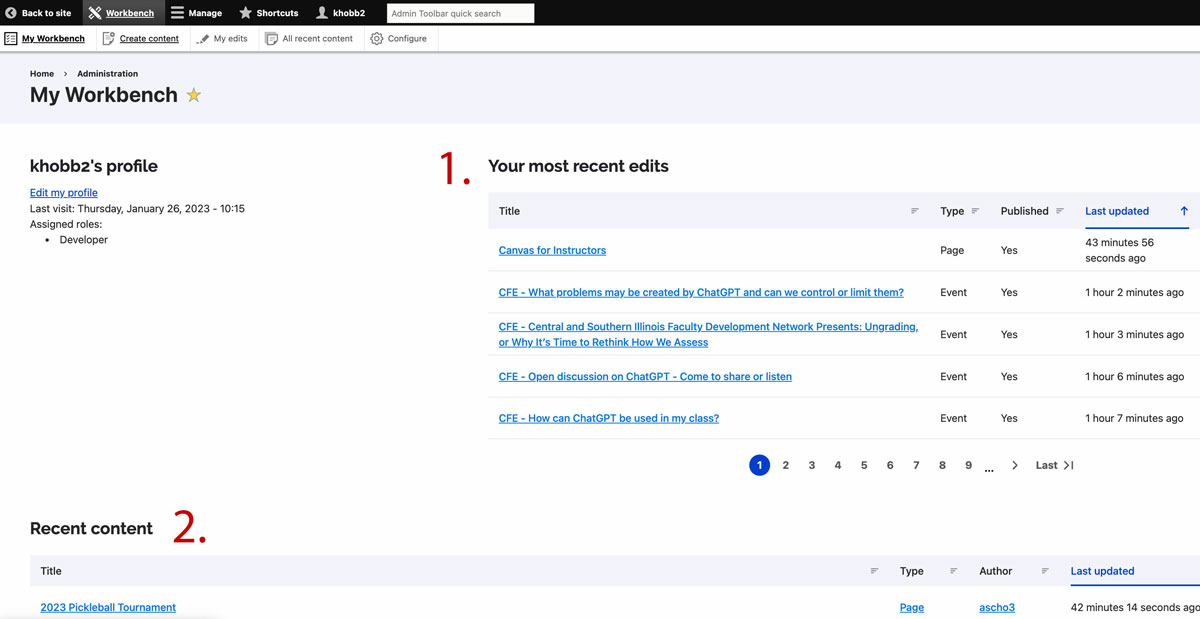
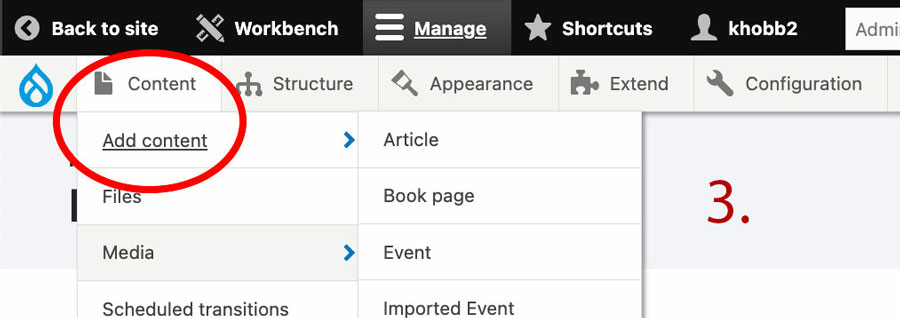
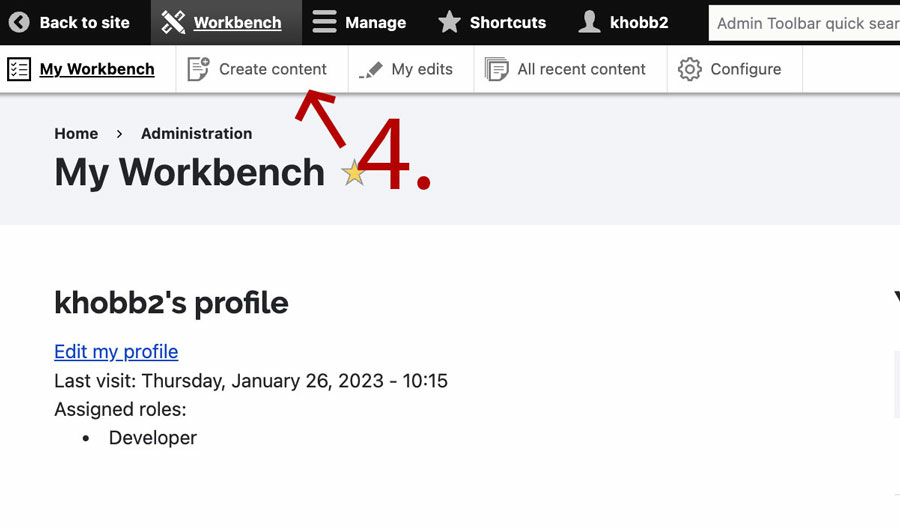
Once you log in, you will be taken to your workbench in Drupal. Here is where you can see updates for pages you edited (1), newly edited pages across UIS’s site (2), and a couple of ways to create content (3 & 4).
How to Edit a Page
+
To edit a page you first must be log into the site. Once you are logged in you will see a black bar at the top of the page with your username. You can visit the URL of your department’s page that needs editing or go to Manage > Content and search for your page by title, and click edit to access the editor.
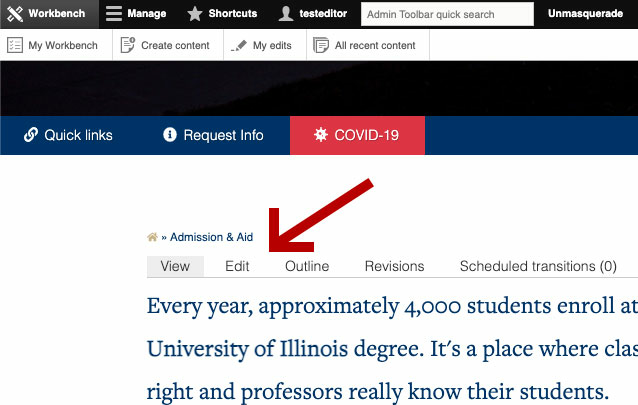
Under the header image of your department’s page will be able to see a line menu of options (View, Edit, Revisions, etc) to interact with the page. Click Edit to open the page within the Gutenberg Editor.
Gutenberg Block Types
+
Within the Gutenberg Editor, you will use what we call "blocks" to edit and format your page. You can see examples of them on the Gutenberg Block Examples page.
How to Add an Image
+
You can add an image a few ways:
- Drag and drop your image into the editor window.
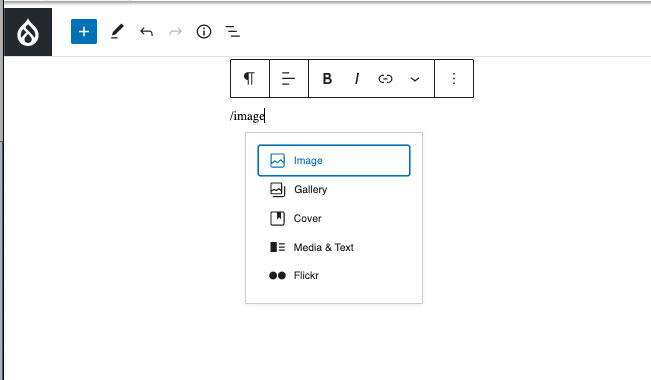
- Type “/image” into the Gutenberg editor and press enter.
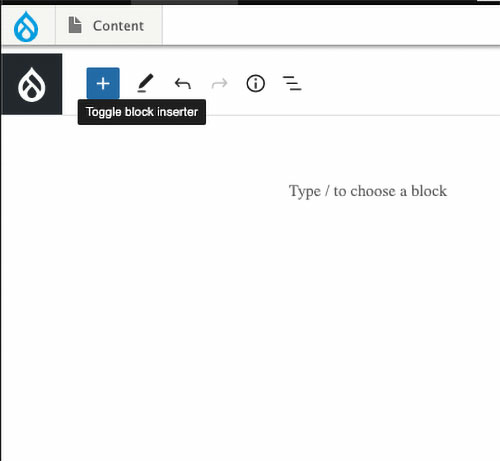
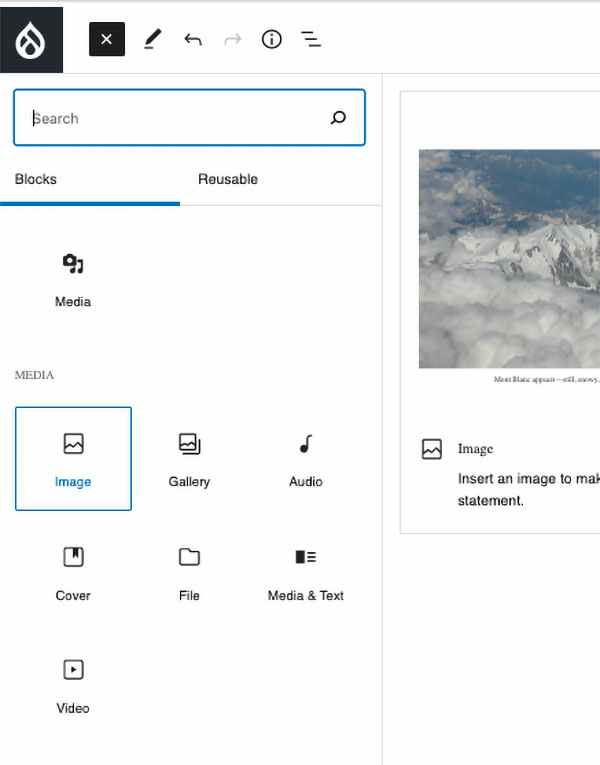
- Click on the blue box with the plus sign, and search for the Image block.
Option 2
Option 3
Upload Your Image
Either upload an image from your computer or browse images that have already been uploaded to the University’s media library. For more information on optimizing images and the best image sizes, please visit Website Resources.
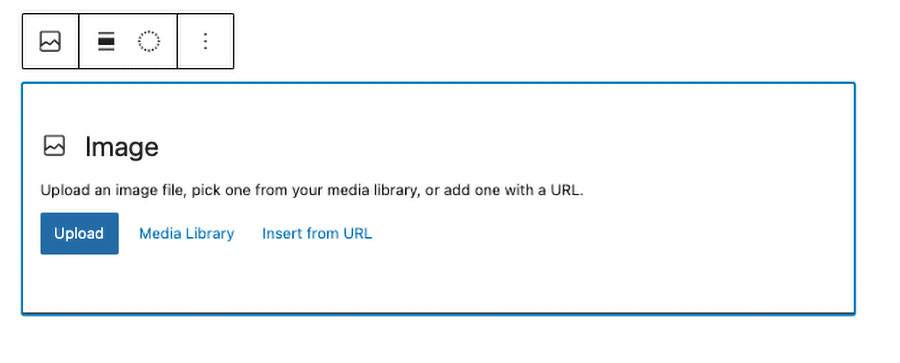
You have the option to upload directly from your computer, search the media library for already uploaded images, or to insert an image with an URL.
Uploading Through the Media Library
While uploading directly from your computer is the easiest option, the best practice is to actually select Media Library, then use the uploader in the media library. This forces you to add alt text to your image in order to save the image. The alt text you enter on the image this way will stay with the image no matter how many times the image is used, so you never have to worry about adding alt text to that image again!
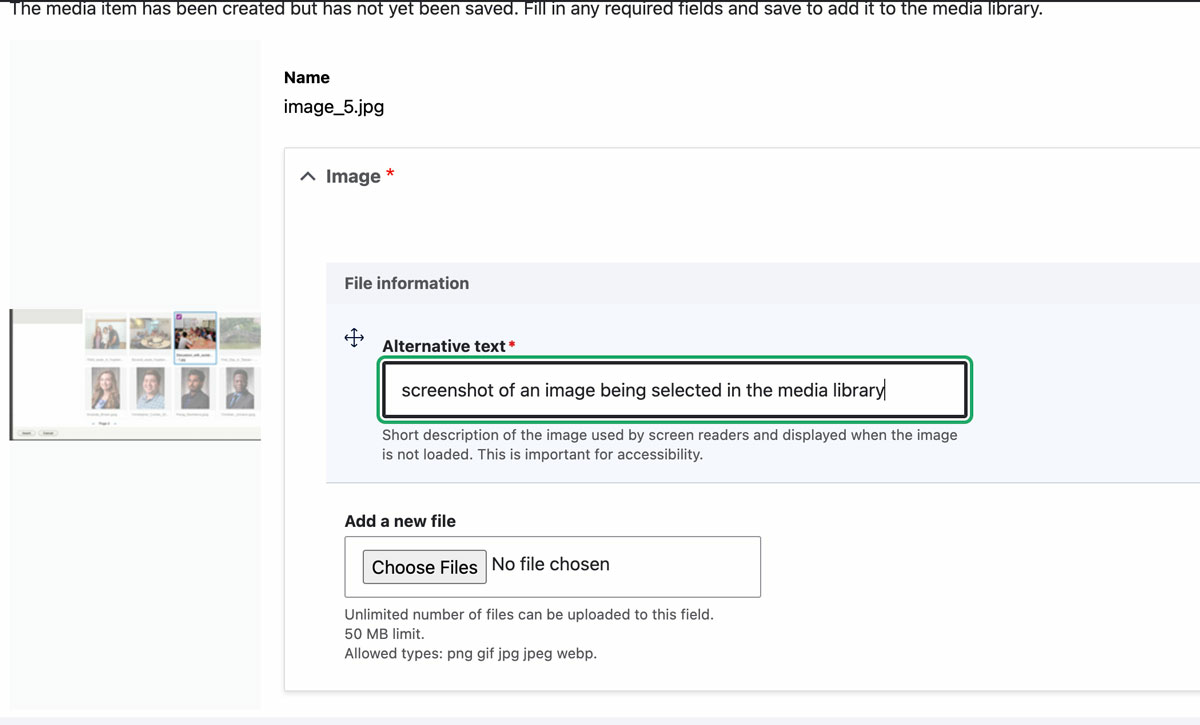
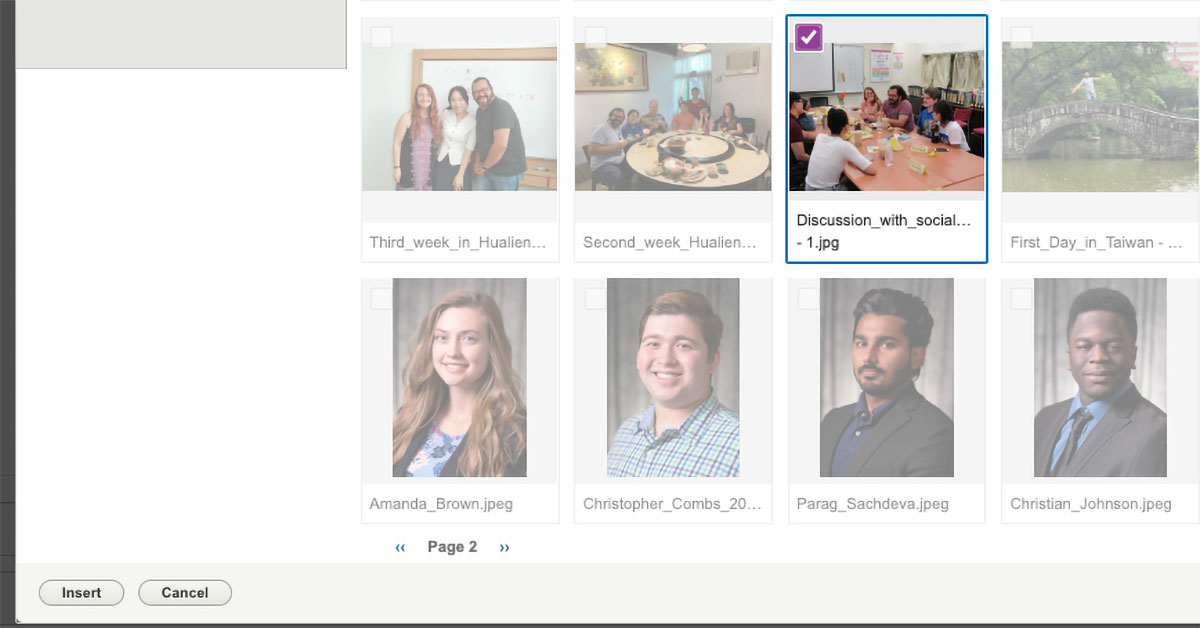
Go ahead and select your image and then click on the insert button if you are selecting an image in the Media Library.
Adding Alt Text to Images
To ensure accessibility of your images, you will need to make sure that your image does not contain any text (unless it is a logo) and has alt text attached to the image. This is a requirement because those who use screen readers need to be able to understand what is happening in your image. If you need to have a flyer or other word heavy imagery, please insert it as an accessible PDF file instead.
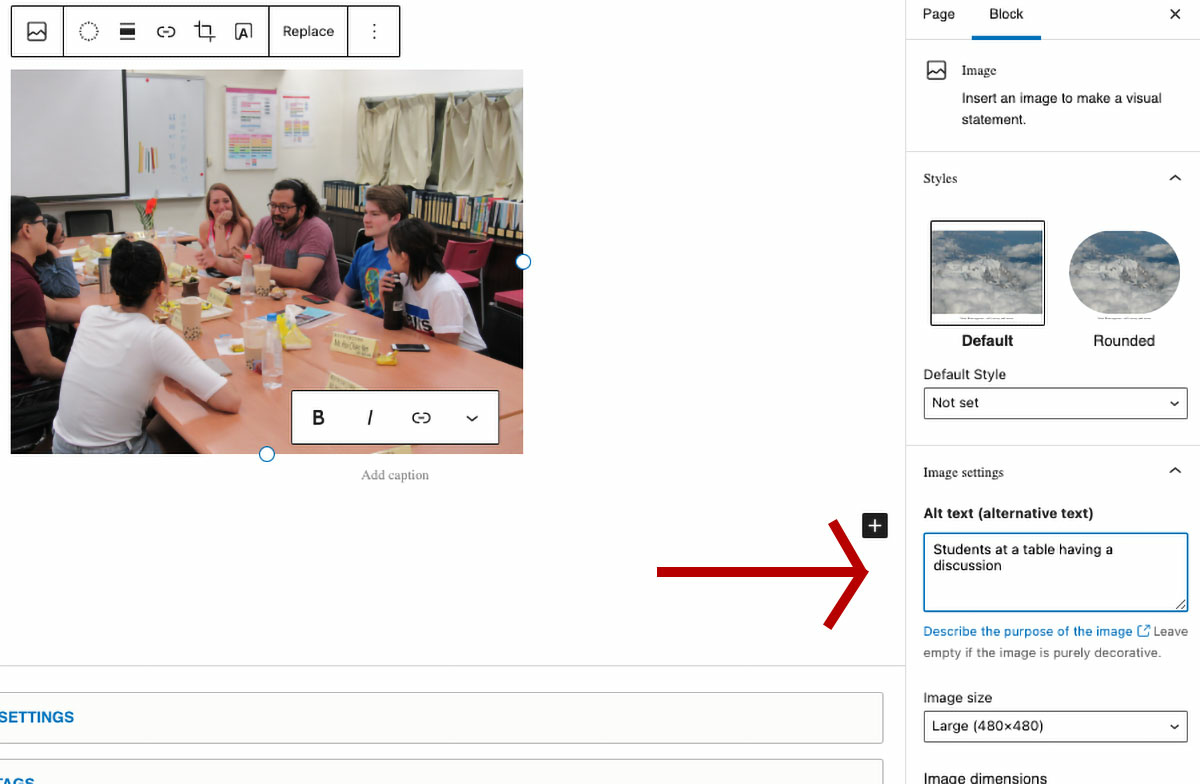
Add the required Alt Text to an image, select your image within the editor and look to the options on the right side of the screen. In the Image Settings, you’ll see a text box to insert your Alt Text. Alt Text is a description of what is going on in the photo. To make sure that those using screen readers have accessibility to the image, you only need to put a short description of what is going on in the image in the box. Avoid longer descriptions so that the screen reader can more efficiently read the page to the user.
Editing an Image in the Editor
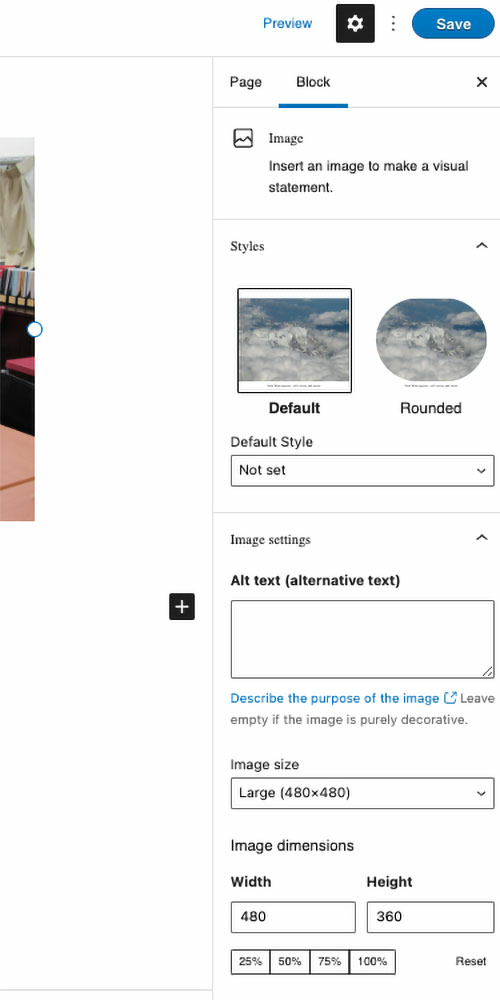
You have a couple of places to play around with how you want your image to look on your web page. You have the Block settings and the menu that appears near your cursor when you select your image. For example, if you notice that your image looks blurry, you may want to go to the block settings and change the image size to “original” and then play with the percentage buttons in the image dimensions in the Block settings. You also have options to crop your image when you click on your image and select the crop button in the pop up menu.
How to Add a Link
+
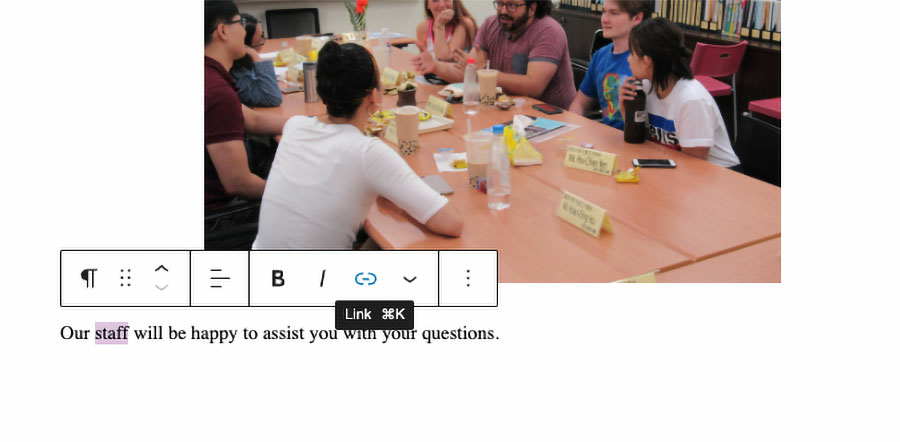
Links can be added to multiple different block types. To add a link to text or an image you first select it, then click the link icon in the Gutenberg editor shown below. You will be presented with a screen where you can input the URL to your link.
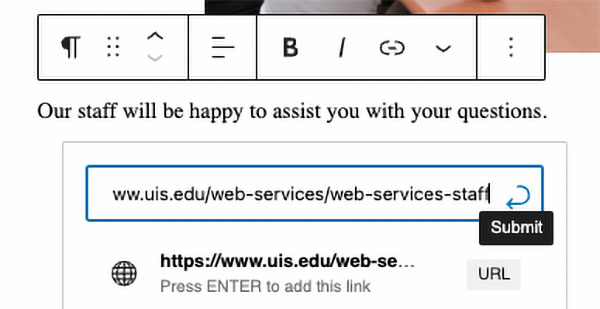
If you are updating a link, you’ll want to make sure that you click the arrow next to the link address. This will ensure that your link updates.
Tips for Links
- Headings as links are not allowed
- Sentences as links are not allowed
- Link titles should match the page title that it is linking to.
- Check the page links when you edit content to make sure that there are still valid.
How to Upload a PDF
+
To upload a PDF, drag it from your desktop and drop it directly into the editor. This will automatically create a File block for you in the editor with your PDF.
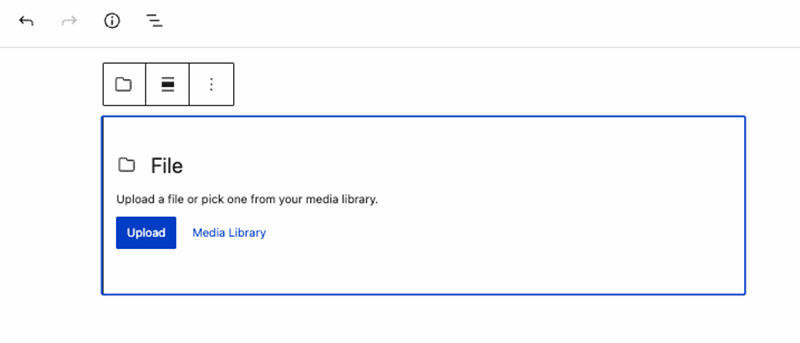
You can also select the File block in the editor (shown below) where you can upload the file from your desktop or search for one from the media library.
Once you have selected uploaded or inserted your PDF, your PDF will be uploaded automatically into a reader (shown below). Make sure that you name your PDF (a).
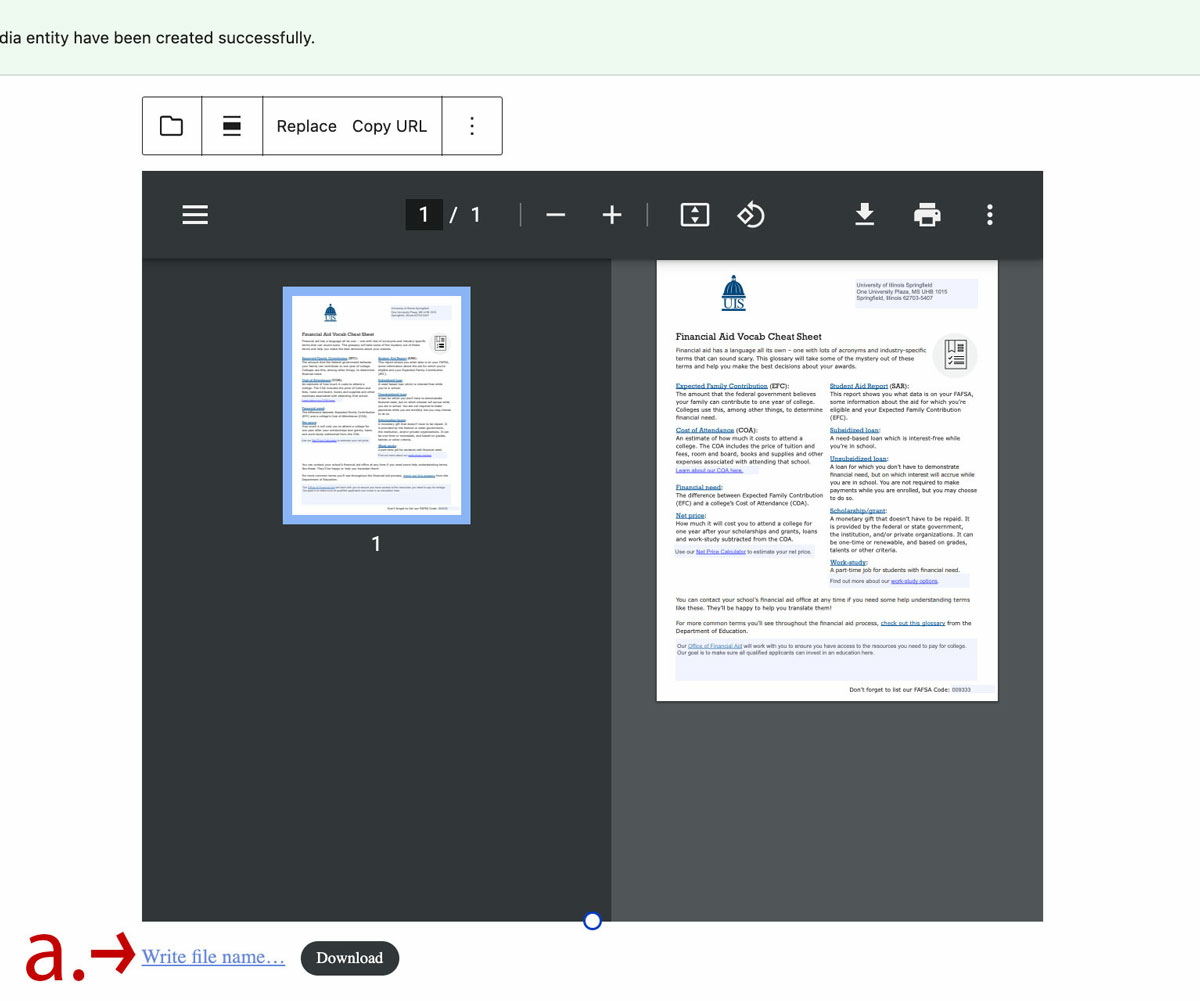
Next, you will want to check the block menu to the right of the editor to make sure that the “Show download button” is disabled (b). You will want to disable it because it causes accessibility issues.
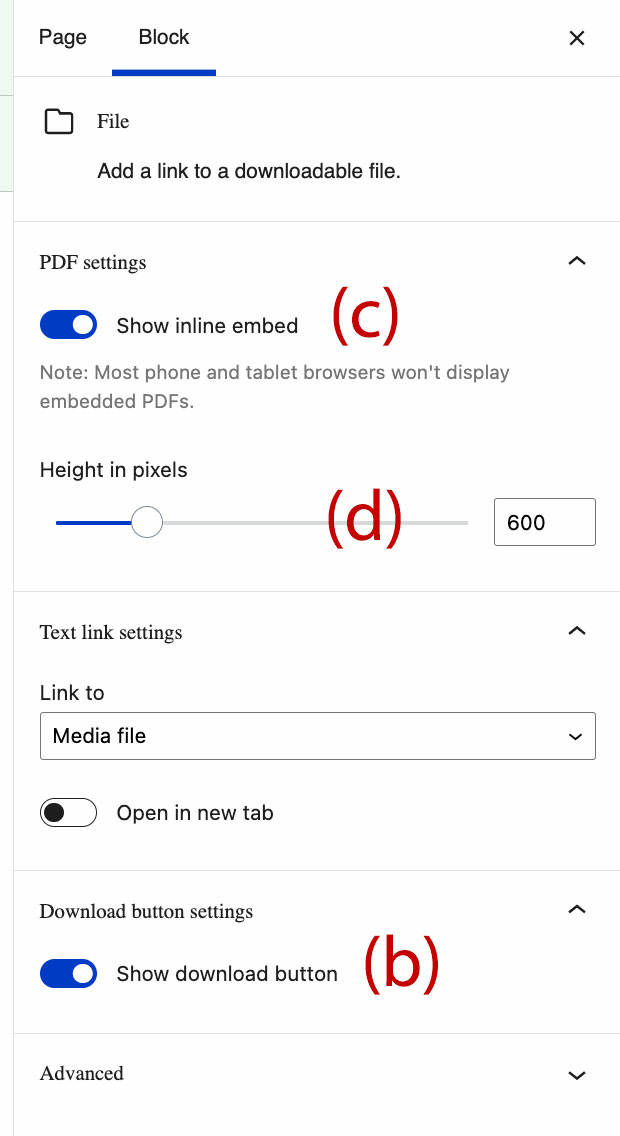
If you do not like having the PDF embedded on your page, you can deselect the “Show inline embed” button (c) to remove it to only have the linked name of the PDF showing.
If you do like the reader, but would like to adjust how tall it is you can also do this (d) in the block options menu.
How to Create a New Page
+
- Click on Manage on the top black tool bar > Hover over Content > Hover over Add Content > Click on Page
- Click on Workbench on the top black tool bar > click on Create Content > Click on Page
Settings to be Aware of
Directly under the main editor window there is a ‘More Settings’ menu. Here are the settings you should be aware of.
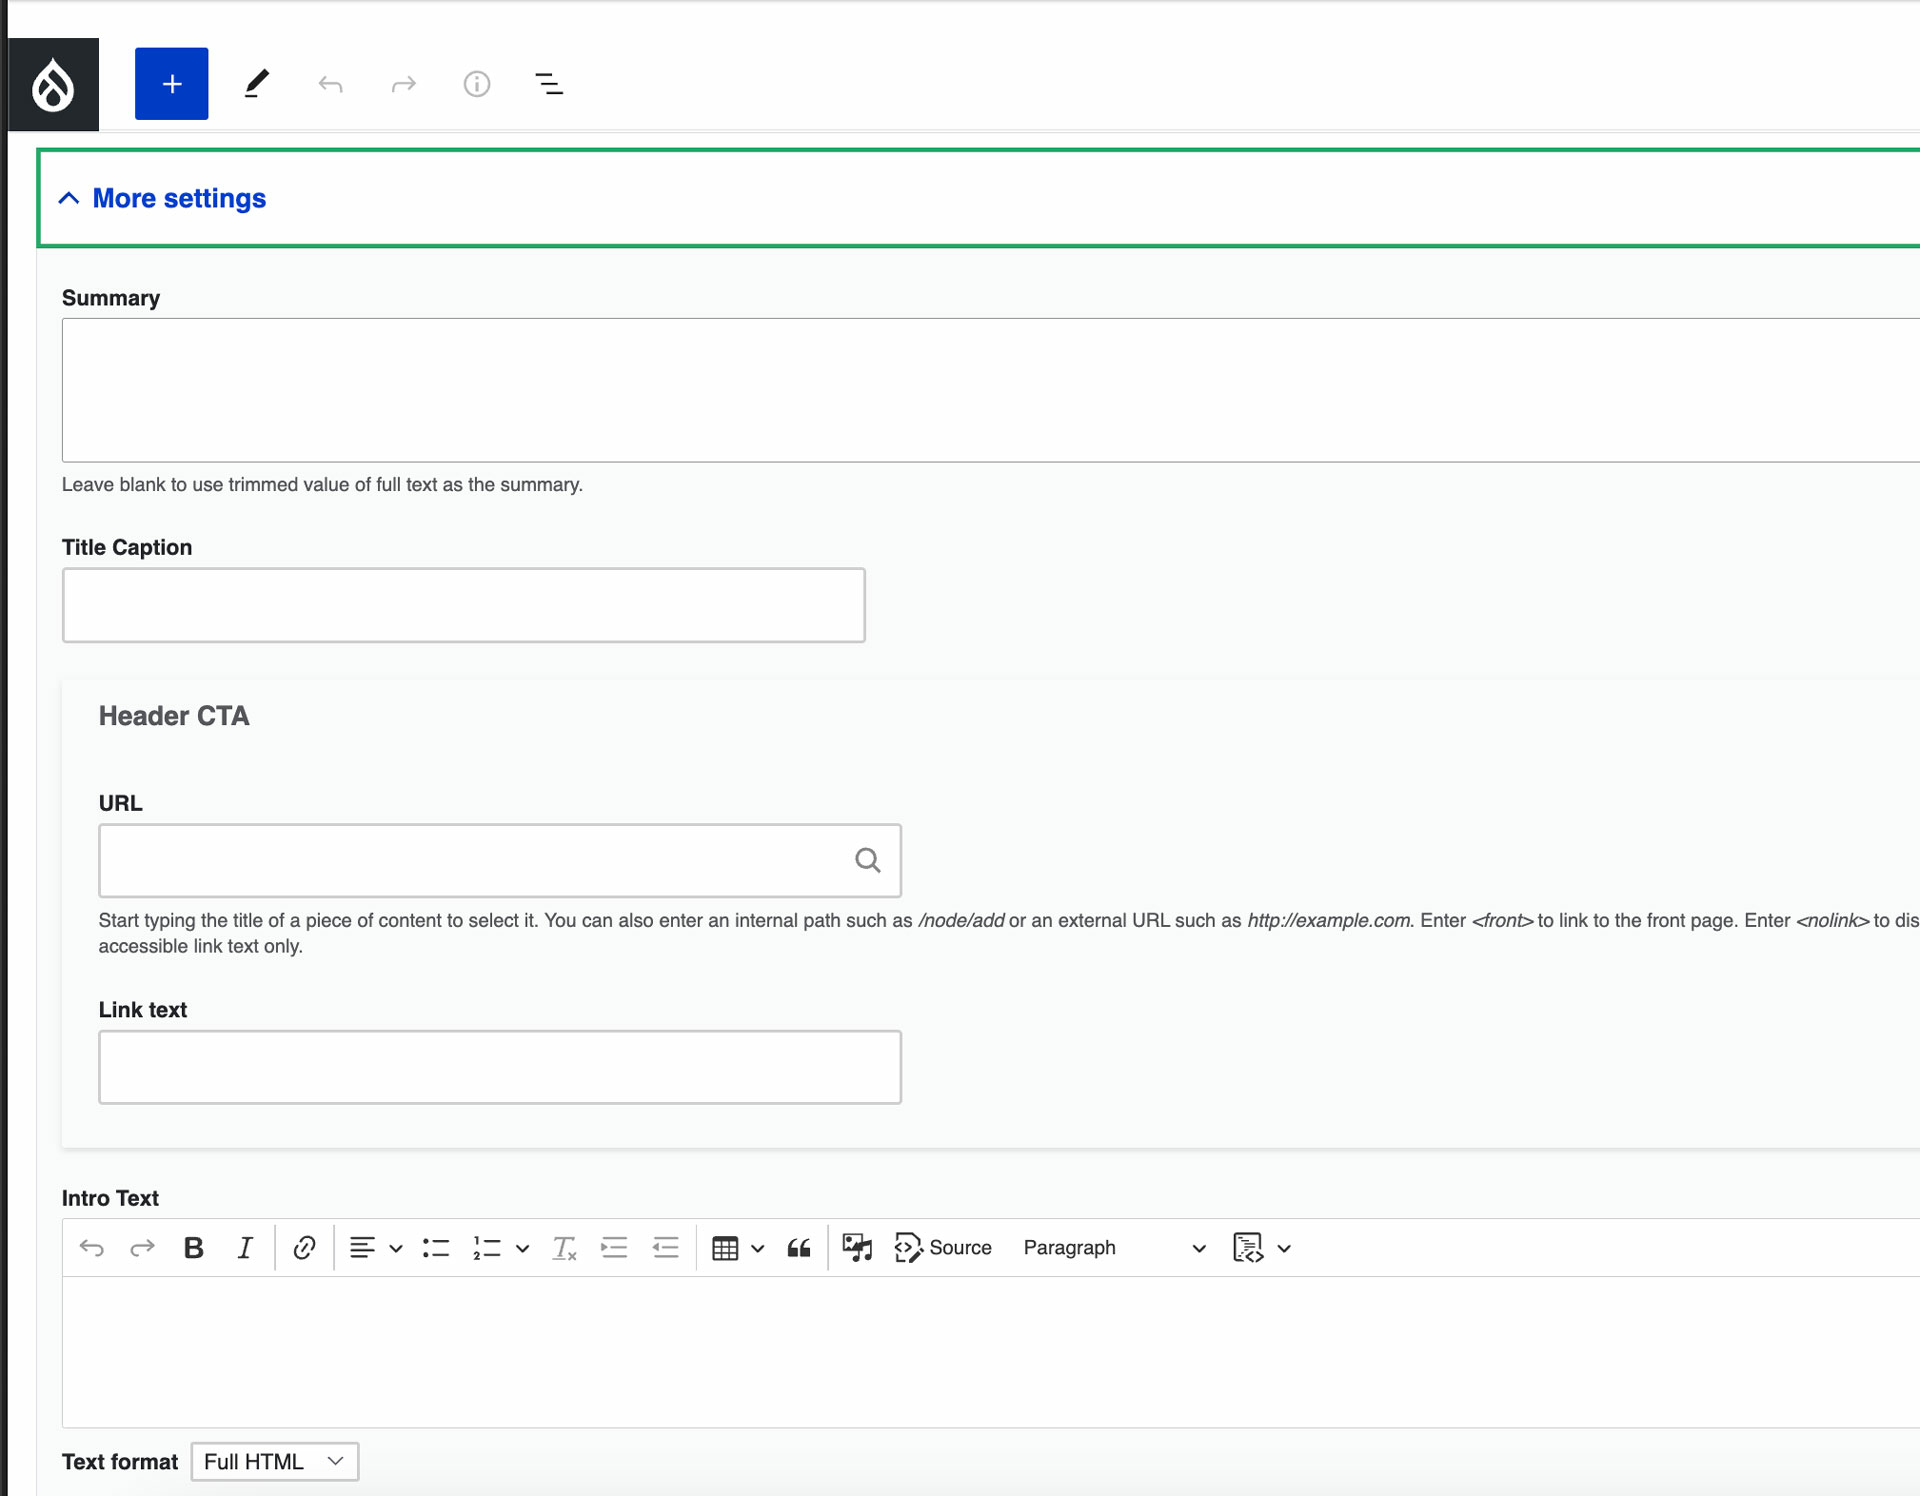
Title Caption
This option displays a sub-title directly under the page title in the header section of the page.
Header CTA
You can add a call-to-action (CTA) button in your header under the title caption and/or the title. A call-to-action element is a web page item that entices the viewer to take some sort of action – such as “Apply Now.” To implement a CTA button, you need to supply a URL and the text for the button.
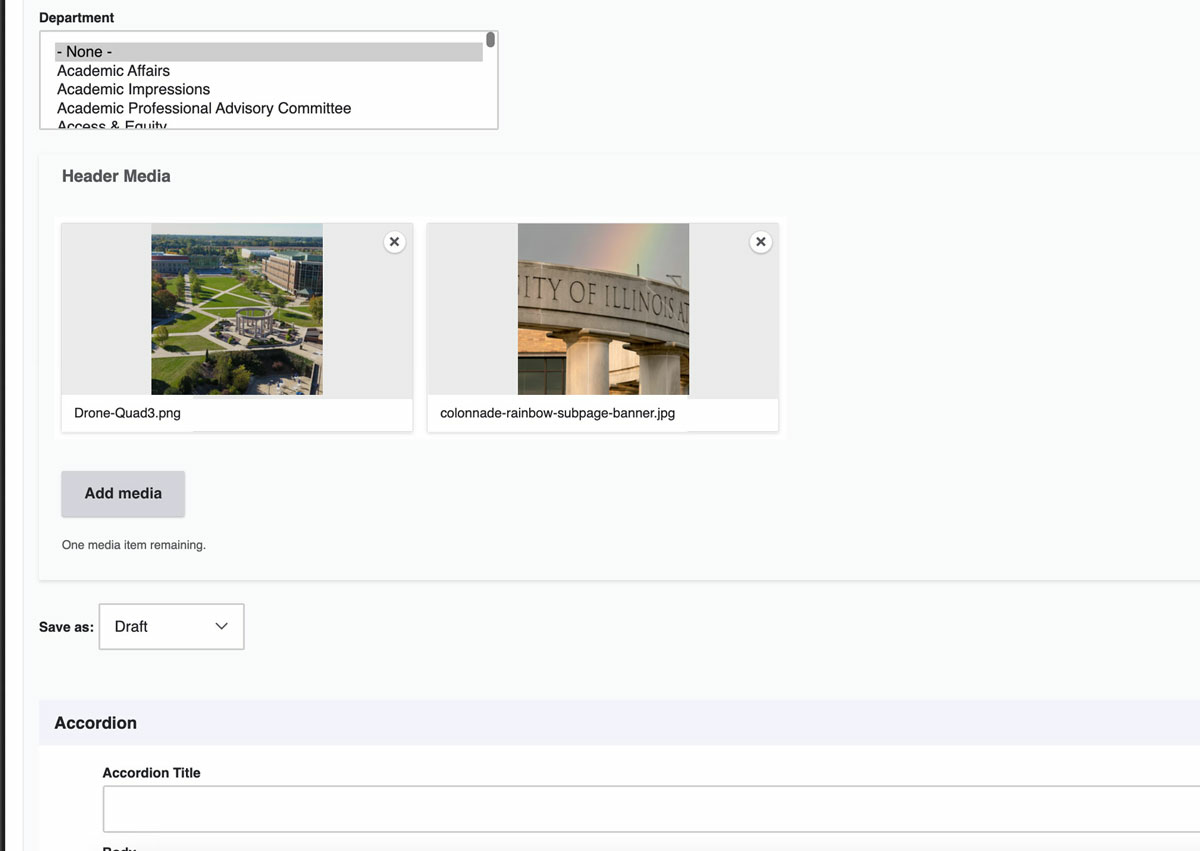
Department
This adds the proper permissions to the page so others with access in the department can edit the content. There is an option to ‘Add another item’ and this is to allow multiple departments to edit and access the same piece of content if multiple departments are responsible.
Header Media
You also have the capability to change the default header image to a different image(s) in the Header Media options. If using multiple images, they will randomly sort on page refresh to show the other images. Even though this is exciting functionality we do recommend using a consistent set of images throughout your department site to pull all your pages together. Sometimes, however, for a special page, it makes more sense to use a separate image.
The default image(s) included can be removed by clicking the X in the top right corner of the image thumbnail. Click ‘Add media’ to access the collection of images or to add a new image.
There are options to search for files in the media library by name or by the user that uploaded them. (Tip: Search the term “hero” to find pre-formatted header images)
If you choose to upload a new file, select ‘Choose File’ and select the image(s) you want to upload. You can select multiple images at once by holding Ctrl for PC or Cmd for Mac while clicking the images.
Hit ‘Save and select’ to select the image and go back to the media library or hit ‘Save and insert’ to insert the image(s) into the page and go back to the page editing screen.
Save As
This is where you change the moderation state of your page. More on this will be discussed in How to Submit Content to be Published.
How to Submit Content to Be Published
+
Once you are done making changes to your page, save the page by going to the Save As section under More Options, select Draft, then click the blue save button in the top-right corner of the screen.
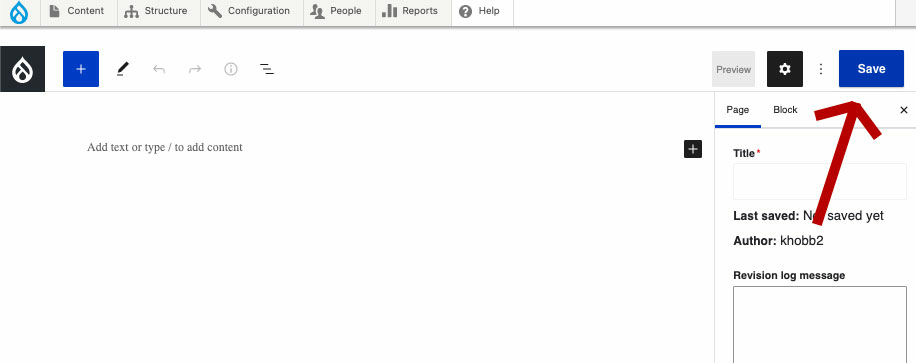
Once you save the page you will see the draft version of your page with a pink background. From here you will want to check the Accessibility Tracker in the bottom right hand corner of the screen (see How to Use the Accessibility Tracker for more information). Make any necessary changes before proceeding. You can then submit the page for ‘Needs Review’ and add a log message from this view if you are ready to submit the page to be published. To do so, make sure the dropdown Change to says ‘Needs Review’ and add a log message if there was something additional you needed assistance with on the page. If the page needs to be added to the menu, describe where in the menu you would like for it to be added. For ex. “Please add under Web & Digital Strategy > About.”
Moderation State Options
The next option you see includes the moderation options for the page. On the site the options are:
- Draft – default option and should be used to preview changes to a page. (NOTE: you will not see your header media changes until the page is published)
- Needs Review – once you are happy with the changes and ready for them to be published, they first need to be reviewed. By selecting this option and saving the page, it will be added to the ‘Needs Review’ queue to be reviewed by the Office of Web Services.
- Unit Review – editors will use this option to submit for review if the unit has a publisher on staff.
- Published* – this option is only visible for the publisher role or higher.
- Scheduled* – new pages and drafts can be scheduled to be published at a future date.
- Archive* – if you no longer want the page to be published on the site, select this option. It retains the page but removes it from the visibility of the site for all users expect users with editing access.
*Only visible to Publisher roles and higher
Once you are done adding the content and configuring your page, change the status to “Needs Review,” then click Save in the top right corner of the page.
Submit for Needs Review to submit your content to Web & Digital Strategy to be published or if your unit has a publisher submit your content for Unit Review. You can include a message in the log message field if you need additional help with something specific.
Please allow 24-48 hours (during business days) for your changes to be published.
Please note: you will not be able to see the header image when it is in Draft or Needs Review mode with a pink background. The header images will appear once the page is published.
How to Create an Event
+
- Click on Manage on the top black tool bar > Hover over Content > Hover over Add Content > Click on Event
- Click on Workbench on the top black tool bar > click on Create Content > Click on Event
This will bring you to the Gutenberg editor to start making your page. You have the same types of blocks to work with in an event page that you do when you work on a regular page. Please see our resource on how to create an event for more details.
How to Add a Featured Profile or News Article
+
- Click on Manage on the top black tool bar > Hover over Content > Hover over Add Content > Click on Article
- Click on Workbench on the top black tool bar > click on Create Content > Click on Article
Please see our resource on how to create a featured profile or news article for more details.
How to Create a Policy
+
- Click on Manage on the top black tool bar > Hover over Content > Hover over Add Content > Click on Policy
- Click on Workbench on the top black tool bar > click on Create Content > Click on Policy
Please see our resource on how to create a policy for more details.
How to Create a FAQ
+
Please see our resource on how to create a FAQ for more information.